Tuesday, April 30, 2013

More Pics of the Peeps

This week we started handling the chicks. The yellow ones, as I stated before, do not like it one little bit. The reds are a close second. The blacks protest a bit, but are easier to catch. Leopold is a snot, but once caught lies still and lets you stroke his head.

Yesterday I let the girls have about 5 minutes of grass time, to see if they would like to peck around. They weren't thrilled. They all huddled together in fear, while one or two picked at a piece of grass.

I'm going to try again today.


Tonight we plan to finish the front of the coop...yeah!

Monday, April 29, 2013

Meet The Peeps...

Here are some photos of our chicks. I've waited until now to hold them or stress them out in any way.

My kids have started naming the girls, but I don't know what they are all called. I only know they are naming them after the boy band "One Direction". I have no idea why, since they are all girls, (except our one rooster) go figure! I named our rooster Leopold.
Meet Leopold the rooster. You can tell him from the girls  because he has a mask around his eyes, and green on his head. He is a Brown Leghorn.

My favorite, other than Leopold, are the black chicks (Black Sex Links). 
They are calm and like to be held.

The girls all huddled together in fear of the camera.


 Can you tell which is Leopold? (Hint, center)

 The red chicks, aka Rhode Island Reds

 My least favorite, but great egg layers, the White Leghorn.
They are very skittish and don't like to be held. Can't you tell by the scream in this pic?


 Hank, meet Leopold.

There is nothing really new to report. I've been dealing with "pasty butt" this week. Although gross, not really a big deal, except catching and checking them all out. Only about 1/3 have it, so I think that is a good thing. For those who don't know what that is, it is when they get poop on their vent, and it could clog them up. Normally a momma hen would clean that up, but since we don't have that option, I am momma hen. It is no different than any of the other countless babies that I've fostered, so not a big deal really.

Our daily schedule is: check feed, water, and heat lamp in the a.m. and p.m. Periodically checking on them throughout the day. I'm trying to add the daily handling of them too, but like I said above the leghorns and reds don't really care for it. My main concern is handling Leopold every day. I want him to be a loving (to humans) rooster and not a terror. I don't know how that will turn out, but here's hoping!

Monday, April 22, 2013

Chicks Are On The Way...

Saturday I finished the footing/base of the chicken mansion (that is the term my friends are calling it).

As I wrote last time, I have put in a 2" Limestone base. Thanks to some "trash" from a demo area, I was able to pick up some foam/rubber mats that I have put over the base. This will not only keep the chickens from digging, but will create more drainage should something happen and the coop be inundated with water.
On top of these mats, I have added another 2" of limestone grit.
Next week I will add a sprinkling of barn lime, and 2" of crushed corn cob. This will complete my footing for the coop.

We also started painting the untreated wood, on the roof and roosts with sealer, to help keep the wood from rotting.

Hubby is going to get started on the door and laying boxes over the next couple of weeks. I am putting hardcloth wire at the top to keep out varmints, and starting to work on their attached outdoor run. So far, the TOTAL cost of our coop (12'X14'X6'h) is just a little over $200. I think that is awesome for what this is turning out to be. We already had the 3 sides, limestone, tin, some of the wood, rubber/foam mats. I have only paid for the wood for the roost, roof, and the fencing.

I want them to have an area to play in during the day, while I'm at work. When I am home, I plan on having them in a "chicken tractor" (still to be made), so they can have access to fresh grass/bugs/food. I can't put them in that, however without my supervision, since it will not be varmint proof. The attached run will allow them to go out and dig around/play/sun/stretch their legs, but won't be big enough for fresh forage.

I took the time, Saturday, to get the chicks "welcome" home ready. I've put in 2" of crushed corn cob, with a thick layer of newspaper on top, in an old water trough. The trough is in a barn stall. The newspaper will keep them from eating the cob, until they understand what food is, and will be removed after day 3. I have their temporary waterer bought, and will put their food in a Styrofoam plate for a day or two. After they get the hang of what food is, I will get them a chicken feeder. They have a heat lamp (hooked to a PVC pipe) that heats to over 100f (at floor level), and they have ample room to move away from the heat if they get hot. I put Styrofoam boards on top (with a wood board for weight) to keep the trough draft free. The only thing I did not do is make a screen top to cover it. The trough is sitting right next to my dog's crate, so I'm hoping the smell/sight of a big dog will keep varmints away from my babies.


The hatchery sent me an email that the chicks are in the mail...and should arrive Wednesday. I'm so excited. I have a trauma kit ready to get those sweeties cleaned up, and eating drinking when they get here. Praying their mail trip is not stressful.

Until next time...

Wednesday, April 17, 2013

Coop Footing/Base Is In...

Yesterday I had the opportunity to start putting the base/footing in the coop.

Dear hubby helped me, with our new wheelbarrow, and we knocked it out in less than an hour.

I've put a 2" #10 KY Limestone Grit in.
Here is the rest of my plan:

On top of this footing, which is mostly to help with drainage and to keep chickens from digging holes, I'm planning on putting rubber mats down. I think I have a source where I can get them pretty cheap...if not I will have to rethink. But IF all goes to plan, on top of this grit will go the mats. On top of the mats (which have holes to let high moisture through), I will then add barn lime. On top of the barn lime, corn cob bedding. The lime will keep the smell down, the bedding will be an easy, rake out the poop bedding.

I will also have a "sandbox" so the chickens can dust themselves as they want.

I'm also planting some "window boxes" with oats/grass/grains, and plan to rotate them in and out to give them something to scratch/eat/play with, in addition to getting to go in their tractor or outdoor run.

Only 7 more days until the babies arrive...I'm getting excited!

Sunday, April 14, 2013

Coop Roof On

This weekend, dear hubby finished the roof on the coop. The coop is now 12'(w)X14'(l)X6'(h).


We left a small gap at the top, which will be covered with chicken wire, for ventilation.
I made two roosting areas. One I made from 1X2 and 3/4, 5/8" dowels, and a 1" treebranch. This will give the chickens preference as to what size roost they would like. I attached it to the wall with zip ties at the  top and buried it in the ground at the bottom, for stability.
I made a second roosting area out of an old, salvaged, pony cart scrap. it is higher up, and they will have to fly up to it, but gives a second option for the girls who want more elbow room.
I still have to finish the front. Hubby is going to make a door for me, and one that is chicken size. I will be enclosing the front with chicken wire and the two doors. Then to the side, the chicken door will lead to an outside run, so the girls can go out during the day when I'm not home. When I am home, I am going to make a "chicken tractor" out of PVC and poultry netting, to turn them out in different parts of the yard. During the winter, we will make a wall out of outdoor paneling, that will go up with zip ties, and straw bales for extra support to enclose the front, and keep the coop draft free.

I've ordered "chicken nipples" to create my outdoor waterer. I will use a 5 gal bucket (with lid), and drill a 3/4" hole toward the bottom. I will then insert a 3/4" PVC pipe, with the nipples inserted, for the water to go into. This will keep the water up off of the ground, and the lid will keep the water clean (and mosquitoes out). If I wanted, I could even mount the bucket outside the coop and run the nippled part through the wire. I think, during the winter, if I put a heat lamp over the bucket, it would keep it from freezing.

I also have a cool idea, that I picked up from a chicken website, of a feeder I'm going to make, using a relish tray and a lidded paint container (bought new, having never had paint in it). I'll post photos if it works. I plan to hang it a bit off of the ground. With it hanging, it should keep the girls busy, when eating, having to peck at it to get their food.

I've also found a website from a lady who is making her own "whole grain" food for the chickens. She has cool "recipes" for complete nutrition, so I don't have to do too much experimentation to find the right "formula". I will start them with proper chick formula, but as they get to be about a month old, I'm going to wean them onto whole, natural food, unprocessed, just like they would get in the wild. Pound for pound the cost should be close, if not a little cheaper.

10 more days until the chicks arrive!! This week we will prepare their baby chick home. I will be using an old water trough (it has a leak, so we don't use it for the horses). In it I will have corn cob litter, covered with newspaper (for the first 3 days), food and water. I will also have a heat lamp to keep them toasty. The trough will be kept in our barn, to keep the chicks safe and draft free.

Until next time...


Saturday, April 6, 2013

Our First Post, Pre-Chickens

So, I was asked by a friend to blog about raising chickens, so I am.

Before you ready this, know that I have NEVER owned a chicken before. I have eaten both chickens and eggs :). My great-grandparents raised chickens, as well as other livestock, and I remember chasing and being chased by chickens. I remember cute little chicks, being hovered over by the hen, while we did our best to distract her, so we could grab and play with the chicks. That is the extent of my expertise.

This blog may end up being a "how not to do it" blog, in the end. We will learn and grow together, hopefully without "blood on our hands" (except for the "time to eat them" part).

 I have read some books, done some reasearch, and am about to partake on a road that hopefully, will lead to healthy and happily raised chickens that will lead to a future of happy and more healthy human consumers.

Just to let everyone know, the husband is not on board with the entire process. He has been "outvoted" and will help out, but he is not enthusiastic about any part of the process. I am hoping to change his mind, and turn him into a happy chicken owner, during this process.

So, with that, here we go...

We live on a 20+ acre (up till now) horse farm. Because of my illness (cancer) we had to give up the horse training/riding instruction part of our farm. So, here we are with 20 acres of weeds.

We talked with our neighbor and have offered 15 acres of "free hay" if they want it, in return for 100 square bales (which will feed my personal horses for a year). Last year they were able to harvest over 300 square and dozens of round bales. If this continues this year, then we will "get our pasture mowed" for free.

I am growing my own vegetable garden this year. I've started carrots, tomatoes, cucumber, onion, green/red/yellow bell peppers, and some others. I'm also going to plant a bunch of corn and green beans. We have SEVERAL "wild" blackberries on our property, enough that I was able to EASILY pick and can over 20 jars worth of jam and syrup.

Now with the chickens, we will be growing/raising our own eggs and meat (hopefully, if I can butcher them) as well.

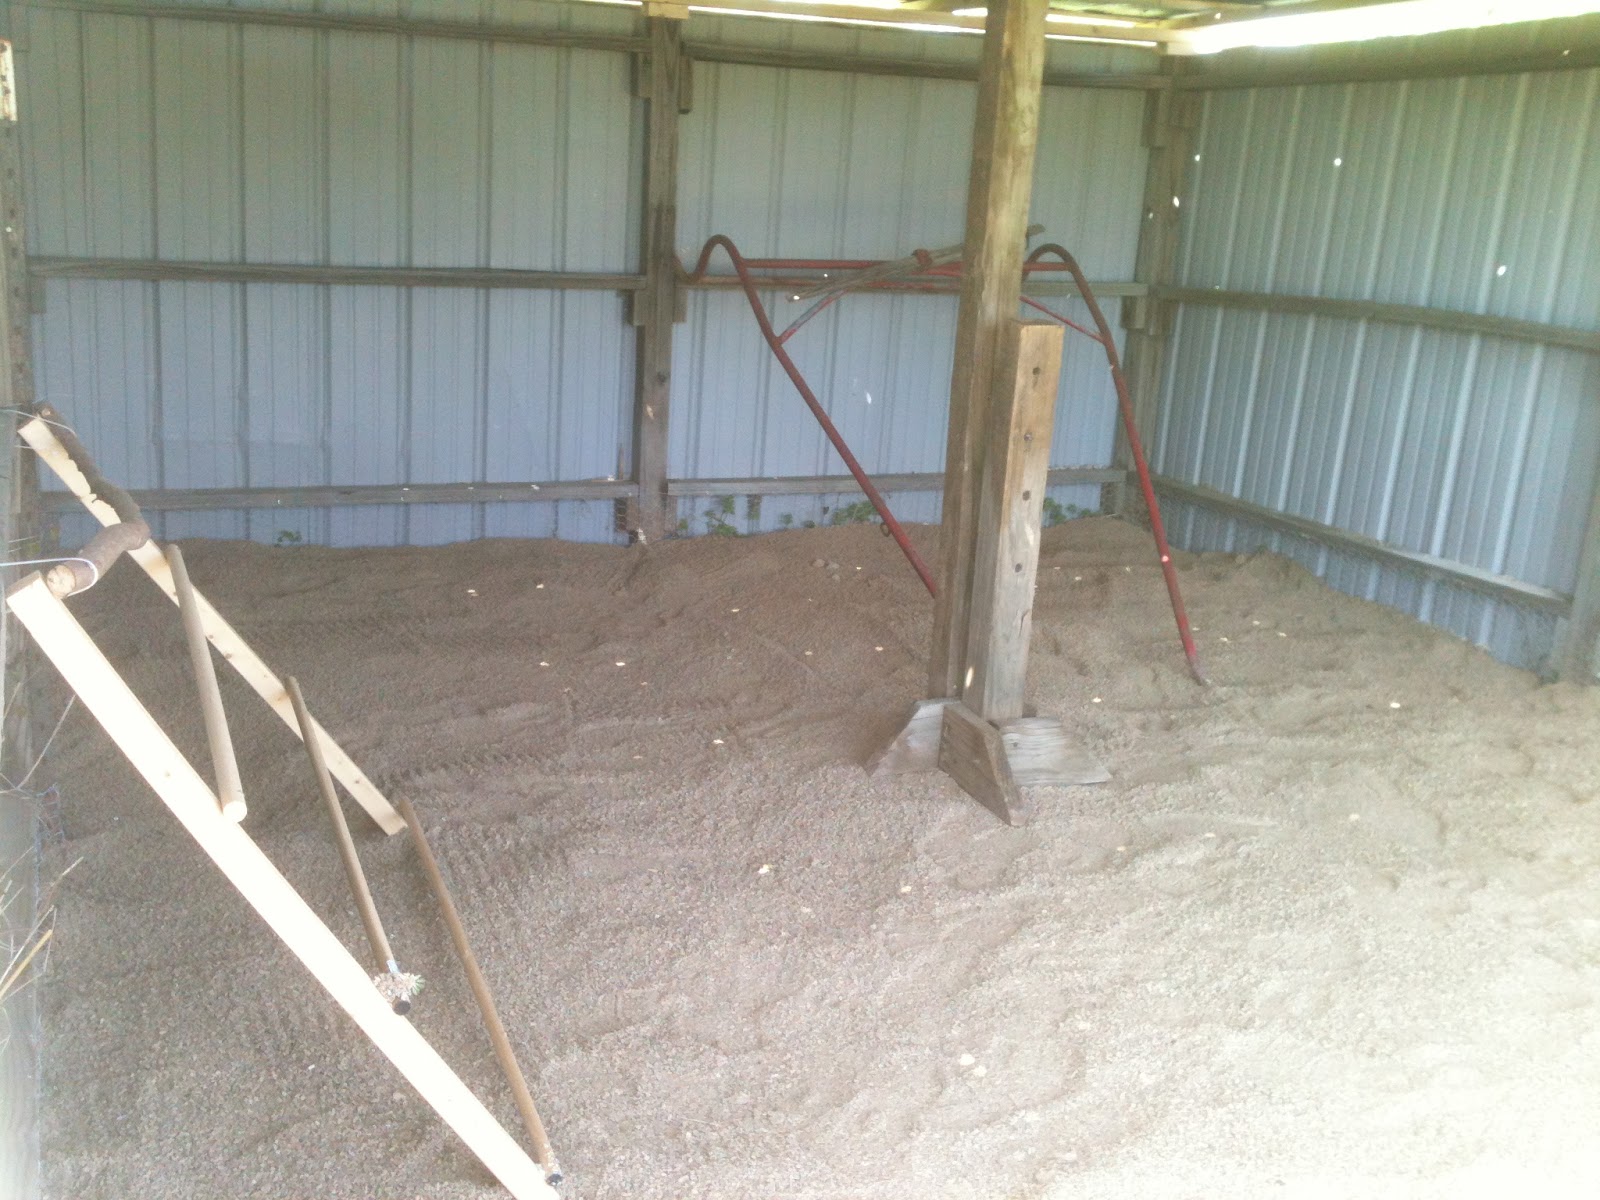
 Back to the chickens. We have a 3 sided shed that we had been using for wood shavings storage. Now that we are out of the horse business, it stands empty, so I am converting it into a coop.

Here is a before picture:
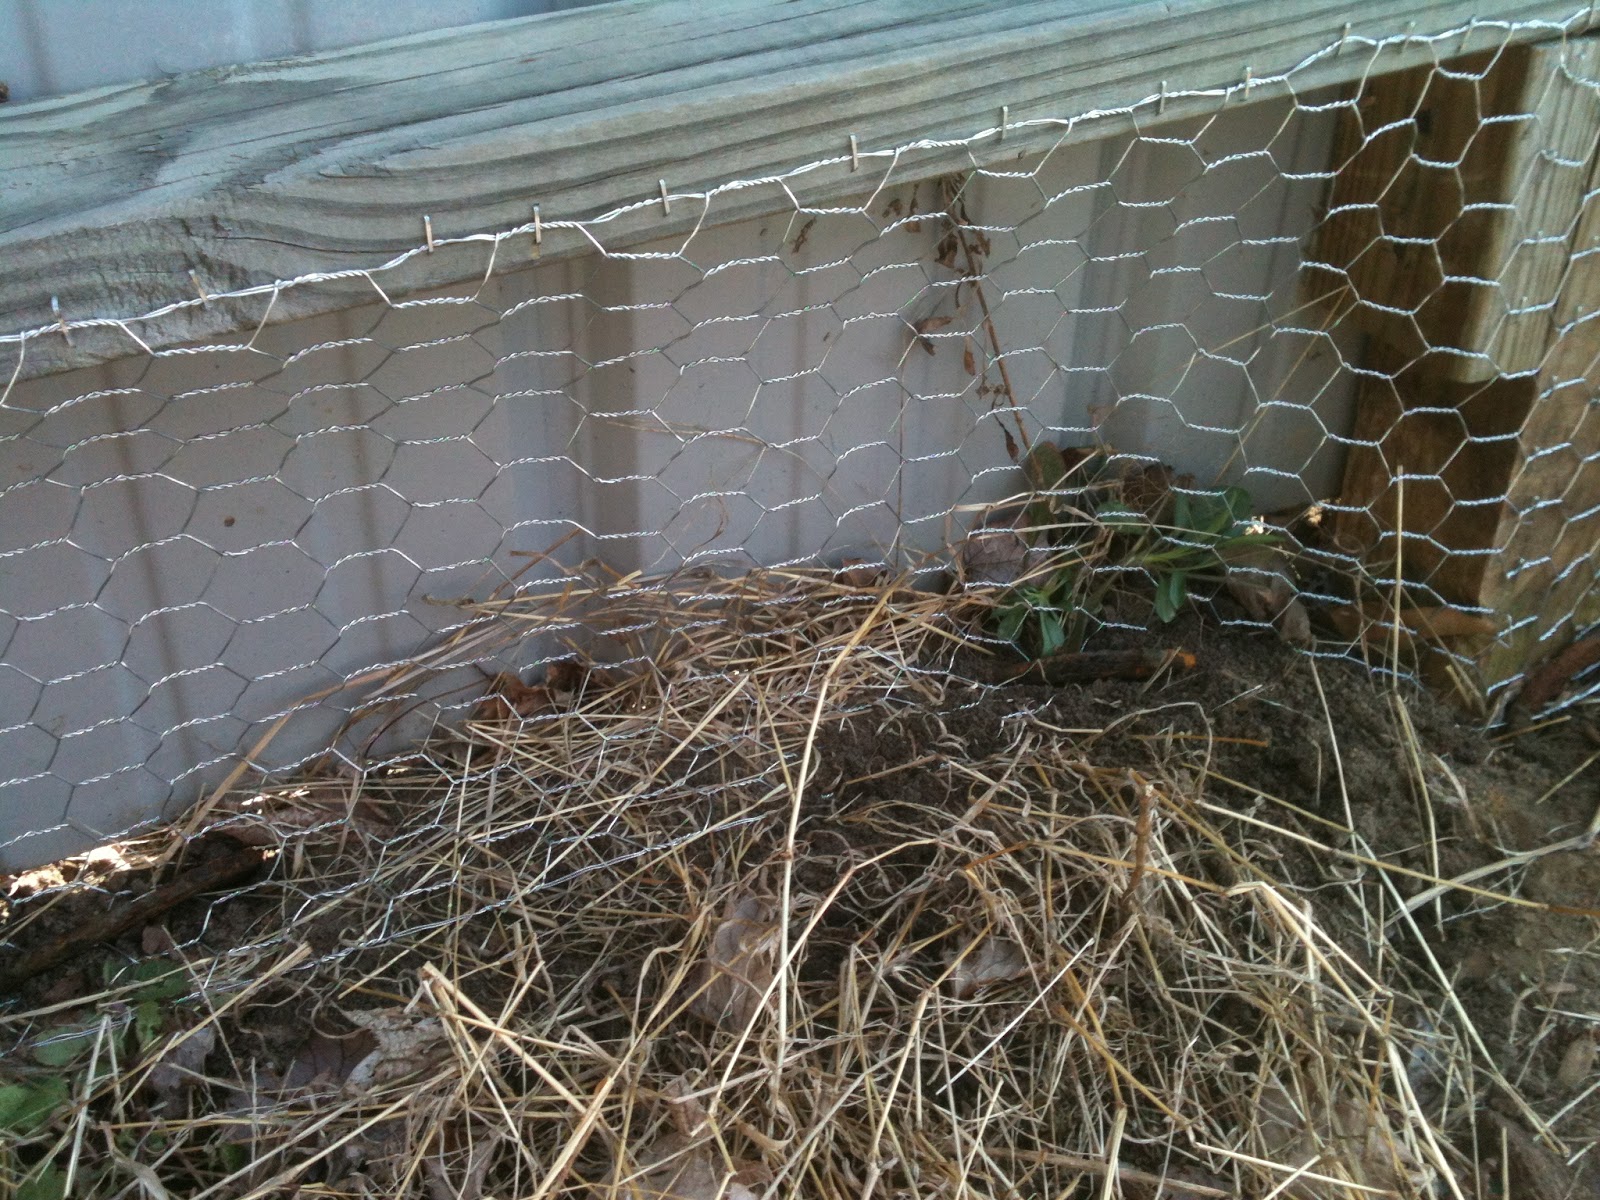
The "junk" laying around it, is all stuff I'm saving to use in the completion of this shed. I have now completed running chicken wire along the entire inside bottom. This will keep chickens from digging out, and varmints from digging in. I used old horseshoes to help "nail down" the wire into the ground.
I completed the wire today.
The next step in the coop is for dear hubby, and his friend to put on a roof (made of of old tin).

I have also ordered my chicks. Here is that I ordered from Cackle Hatchery: 5 Rhode Island Red pullets (hens), 5 White Leghorns, and 5 Sexlinks (this is a crossbreed), and one Brown Leghorn cockerel (rooster). I also want to add to my chickens one (or two) white Silkies. I can't add them right now, because there is a minimum 15 order, and I really don't need 15 in addition to what I will already have. So I'm researching to see where I can just get the one or two. I want to have them, because they will be my brooding hens.

Why/what do I need a brooding hen for? I want my chickens to be egg layers, not mothers. However, I also want to have babies to keep my numbers up. Having one (or two) designated moms will allow my other hens to do their jobs (laying eggs) while freeing them up to keep laying. If they start mothering, then they will not only quit laying, but will get in bad habits of fighting other hens and pecking the hands grabbing eggs. IF I want chicks, then I can simply move the silkies to a quieter location, and place the eggs with her to mother/raise.

My new chicks will arrive on April 24th. Until then, I'm focusing on getting the coop completed.

They won't be able to go into the coop for a while, until then, they will be in an old water trough, in the barn, with a heat lamp/food/water.

Will update later...